For companies that need to comply with internal quality controls, industry regulations or government regulations, verifying the amount of torque they are applying to their caps is crucial.
When people are first confronted with the challenge of calibrating their capping machine, there is little information available to them on how to go about it. As a result, we often find that our customers devise methods to calibrate their capping machine that seem reasonable, but then grow frustrated that their methods do not yield accurate results.
At the root of this confusion is that most people are not aware that you cannot directly measure the torque that a capping machine applies to a cap. If you are curious about learning why, please click here.
It is for this reason that the proper method for validating the amount of torque you are applying to your caps is to follow the Method of Test for Closure Torque. We will explain this procedure below. A video tutorial is also located on this page.
An Overview of the Method of Test for Closure Torque
The Method of Test for Closure Torque was developed by the Plastic Bottle Institute of the Society of the Plastics Industry (Technical Bulletin PBI 7). Their objective was to produce a common test procedure that could be used by both the producers and users of caps and bottles.
Producers use this test method during their product development phase to determine the application torque specification for a particular cap and bottle. Through product testing, they have determined that if the cap is applied with the amount of torque they specify, then the cap will be properly sealed onto the container. Users follow the same test method to validate that they are applying the amount of torque to the cap that the producer has specified.
Application torque specifications are expressed as a range. For example, the specified application torque range for the cap and bottle we use in the video is 13-17 inch pounds. Another common format is to express an application torque range as a value and any amount greater than that value. For example, 25 inch pounds and greater. This type of format is common when packaging hazardous materials that are subject to DOT regulations. You will never see a torque specification given as one particular value (20 inch pounds for example); some amount of tolerance is always specified. The supplier of your closures should be able to provide you with the application torque specification upon request.
Some manufacturers not only provide the application torque specification for the cap they will also provide the removal torque specification. Removal torque specifications are expressed as ranges in the same formats as the application torque ranges listed in the paragraph above. If your cap and bottle supplier provides you with the removal torque specification, this will save you some time when calibrating your cap tightener as you will learn below.
The fundamental underpinning of the Method of Test for Closure Torque is that there exists a correlation between the amount of torque applied to a cap and its corresponding removal torque (also commonly referred to as release torque). The removal torque of a cap is the amount of twisting force required to loosen the cap. You will see examples of this correlation in the video. For instance, when we apply approximately 17 inch pounds of torque onto the cap, you will see that the cap consistently removes with approximately 12.5 inch pounds of torque.
This correlation is very important because as mentioned above we cannot accurately measure the torque applied by the capping machine. However, with the use of a bottle cap torque tester we can measure the removal torque of a cap that has been tightened by the capping machine. Since we can measure the removal torque of the cap applied by the capping machine we can then work backward to arrive at the amount of torque the capping machine is applying to the cap. To stay with our example, we know that if the cap that we just tightened with the capping machine removes with approximately 12.5 inch pounds of torque then we are applying approximately 17 inch pounds of torque onto the cap.
A bottle cap torque tester is used throughout the procedure to perform the following four functions:
- It allows you to determine the correlation between the application torque specification and removal torque specification for your cap.
- It allows you to measure the removal torque of the caps applied by your capping machine.
- It guides you in calibrating your bottle capping machine to apply the proper amount of torque to your caps.
- It validates that your capping machine is applying the proper amount of torque to your caps.

When performing the procedure we are going to be clamping bottles into the bottle cap torque tester and then applying and removing the caps by hand. Below are some important instructions to follow:
- When you are applying or removing a cap from a bottle that is clamped into a bottle cap torque tester you must do so very slowly and at an even rate. Be consistent with your approach on every trial. Try not to be slow and steady on one trial and then noticeably faster on the next. Applying or removing caps quickly or erratically will produce inaccurate results.
- Be sure to always use new caps and bottles when performing your tests. Reusing caps and bottles will produce inaccurate results.
- Always perform torque testing with the containers filled with their contents as normal.
- Avoid spillage of product on the threads of the bottle or closure as this can lead to inaccurate results.
How to Calibrate Your Capping Machine
Below we will explain each step that is required to calibrate your capping machine. You can also see each of these steps performed in the accompanying video tutorial.
In our example we are going to calibrate a Kinex SA-2000 Benchtop Capping Machine to properly tighten a 28mm cap onto an 8 ounce modern round bottle. We have contacted the manufacturer of the cap and bottle and they told us that the application torque specification for this cap and bottle combination is 13.0 – 17.0 inch pounds. Within this torque range, the cap will be properly seated onto the container and provide a high quality closure.
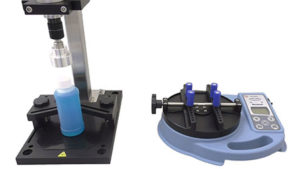
Now that we have the application torque specification, we will use a Mecmesin Tornado bottle cap torque tester to determine the correlating removal torque specification. We will start at the low end of the specified torque range, 13.0 inch pounds.
Clamp a bottle into the bottle cap torque tester. By hand, apply the cap to the bottle slowly and evenly. As you tighten the cap you will notice that the top number on the torque tester is displaying the amount of torque you are applying to the cap. Continue to tighten the cap until the torque tester indicates that you have applied 13.0 inch lbs. of torque. It is ok if you miss exactly 13.0 inch pounds when you apply the cap. A reading such as 13.1 inch pounds on the high side or 12.9 inch pounds on the low side is sufficiently accurate to help us find our correlations.
Next, unscrew the cap from the bottle slowly and steadily. Continue to unscrew the cap until you feel it break free, or release. When the cap breaks free, the middle number on the torque tester will provide you with the removal torque value. As you will see in the accompanying video, on our first trial the cap removed at 8.6 inch lbs.
Repeat this step for as many trials as is required for a true correlation to become obvious. As you will see in the video, our 2nd trial resulted in a removal torque of 8.8 inch pounds and our 3rd trial also resulted in a removal torque of 8.8 inch pounds. So the correlation revealed itself quickly. When we applied approximately 13 inch pounds of torque onto the cap, the resulting removal torque is approximately 8.6 – 8.8 inch pounds. We will choose 8.6 inch pounds, since it is a valid reading; it must be included within our range.
We then performed the same procedure for the high end of the application torque specification, 17.0 inch lbs. On the first trial in our video you will see that we applied 17.0 inch pounds of torque onto the cap and it removed at 12.5 inch pounds of torque. On the second trial the cap again removed at 12.5 inch pounds of torque and on the third trial it once again removed at 12.5 inch pounds. So this correlation is remarkably consistent and obvious, when we apply approximately 17 inch pounds of torque onto the cap, the removal torque of the cap is approximately 12.5 inch pounds.
These correlations allow us to define our removal torque specification. An application torque range of 13.0 – 17.0 inch pounds correlates to a removal torque range of 8.6 – 12.5 inch pounds.
Now that we have our removal torque range, we can begin calibrating the capping machine. We will adjust the torque output on the capping machine until the caps that we tighten with the capping machine remove within the range of 8.6 – 12.5 inch pounds. If the caps tightened by the capping machine remove within this range, then we know we are applying between 13 and 17 inch pounds of torque onto the caps, just as the manufacturer has instructed us to.
In the video you will see that we start with the torque adjustment dial on the capping machine set to zero on the torque scale. We then tighten our first cap with the capping machine. After the cap has been tightened, we then place the capped bottle into the bottle cap torque tester. We then slowly and steadily remove the cap from the container to measure the removal torque. On our first trial we found that the removal torque reading was 2.74 inch pounds. This is far below our target removal torque range of 8.6-12.5 inch pounds so this tells us that we must increase the torque output of the capping machine. As you will see in the video we continue to adjust the torque output of the capping machine until the removal torque of the caps tightened by the bottle capping machine always fall within our specified removal torque range of 8.6 – 12.5 inch pounds. Our capping machine is now properly calibrated.